0%

Redis中的数据结构

Redis中的数据结构

原文地址 Redis中的数据结构

1. 底层数据结构, 与Redis Value Type之间的关系

对于Redis的使用者来说, Redis作为Key-Value型的内存数据库, 其Value有多种类型.

  • String
  • Hash
  • List
  • Set
  • ZSet

这些Value的类型, 只是”Redis的用户认为的, Value存储数据的方式”. 而在具体实现上, 各个Type的Value到底如何存储, 这对于Redis的使用者来说是不公开的.

举个粟子: 使用下面的命令创建一个Key-Value

1
SET "Hello" "World"

对于Redis的使用者来说, Hello这个Key, 对应的Value是String类型, 其值为五个ASCII字符组成的二进制数据. 但具体在底层实现上, 这五个字节是如何存储的, 是不对用户公开的. 即, Value的Type, 只是表象, 具体数据在内存中以何种数据结构存放, 这对于用户来说是不必要了解的.

Redis对使用者暴露了五种Value Type, 其底层实现的数据结构有8种, 分别是:

  • SDS - simple synamic string - 支持自动动态扩容的字节数组
  • list - 平平无奇的链表
  • dict - 使用双哈希表实现的, 支持平滑扩容的字典
  • zskiplist - 附加了后向指针的跳跃表
  • intset - 用于存储整数数值集合的自有结构
  • ziplist - 一种实现上类似于TLV, 但比TLV复杂的, 用于存储任意数据的有序序列的数据结构
  • quicklist - 一种以ziplist作为结点的双链表结构, 实现的非常苟
  • zipmap - 一种用于在小规模场合使用的轻量级字典结构

而衔接”底层数据结构”与”Value Type”的桥梁的, 则是Redis实现的另外一种数据结构: redisObject. Redis中的Key与Value在表层都是一个redisObject实例, 故该结构有所谓的”类型”, 即是ValueType. 对于每一种Value Type类型的redisObject, 其底层至少支持两种不同的底层数据结构来实现. 以应对在不同的应用场景中, Redis的运行效率, 或内存占用.

2. 底层数据结构

2.1 SDS - simple dynamic string

这是一种用于存储二进制数据的一种结构, 具有动态扩容的特点. 其实现位于src/sds.h与src/sds.c中, 其关键定义如下:

1
2
3
4
5
6
7
8
9
10
11
12
13
14
15
16
17
18
19
20
21
22
23
24
25
26
27
28
29
30
31
32
typedef char *sds;

/* Note: sdshdr5 is never used, we just access the flags byte directly.
* However is here to document the layout of type 5 SDS strings. */
struct __attribute__ ((__packed__)) sdshdr5 {
unsigned char flags; /* 3 lsb of type, and 5 msb of string length */
char buf[];
};
struct __attribute__ ((__packed__)) sdshdr8 {
uint8_t len; /* used */
uint8_t alloc; /* excluding the header and null terminator */
unsigned char flags; /* 3 lsb of type, 5 unused bits */
char buf[];
};
struct __attribute__ ((__packed__)) sdshdr16 {
uint16_t len; /* used */
uint16_t alloc; /* excluding the header and null terminator */
unsigned char flags; /* 3 lsb of type, 5 unused bits */
char buf[];
};
struct __attribute__ ((__packed__)) sdshdr32 {
uint32_t len; /* used */
uint32_t alloc; /* excluding the header and null terminator */
unsigned char flags; /* 3 lsb of type, 5 unused bits */
char buf[];
};
struct __attribute__ ((__packed__)) sdshdr64 {
uint64_t len; /* used */
uint64_t alloc; /* excluding the header and null terminator */
unsigned char flags; /* 3 lsb of type, 5 unused bits */
char buf[];
};

SDS的总体概览如下图:

其中sdshdr是头部, buf是真实存储用户数据的地方. 另外注意, 从命名上能看出来, 这个数据结构除了能存储二进制数据, 显然是用于设计作为字符串使用的, 所以在buf中, 用户数据后总跟着一个\0. 即图中 “数据” + “\0” 是为所谓的buf

SDS有五种不同的头部. 其中sdshdr5实际并未使用到. 所以实际上有四种不同的头部, 分别如下:

  • len分别以uint8, uint16, uint32, uint64表示用户数据的长度(不包括末尾的\0)
  • alloc分别以uint8, uint16, uint32, uint64表示整个SDS, 除过头部与末尾的\0, 剩余的字节数.
  • flag始终为一字节, 以低三位标示着头部的类型, 高5位未使用.

当在程序中持有一个SDS实例时, 直接持有的是数据区的头指针, 这样做的用意是: 通过这个指针, 向前偏一个字节, 就能取到flag, 通过判断flag低三位的值, 能迅速判断: 头部的类型, 已用字节数, 总字节数, 剩余字节数. 这也是为什么sds类型即是char *指针类型别名的原因.

创建一个SDS实例有三个接口, 分别是:

1
2
3
4
5
6
7
8
9
10
11
12
13
14
15
// 创建一个不含数据的sds: 
// 头部 3字节 sdshdr8
// 数据区 0字节
// 末尾 \0 占一字节
sds sdsempty(void);
// 带数据创建一个sds:
// 头部 按initlen的值, 选择最小的头部类型
// 数据区 从入参指针init处开始, 拷贝initlen个字节
// 末尾 \0 占一字节
sds sdsnewlen(const void *init, size_t initlen);
// 带数据创建一个sds:
// 头部 按strlen(init)的值, 选择最小的头部类型
// 数据区 入参指向的字符串中的所有字符, 不包括末尾 \0
// 末尾 \0 占一字节
sds sdsnew(const char *init);
  • 所有创建sds实例的接口, 都不会额外分配预留内存空间
  • sdsnewlen用于带二进制数据创建sds实例, sdsnew用于带字符串创建sds实例. 接口返回的sds可以直接传入libc中的字符串输出函数中进行操作, 由于无论其中存储的是用户的二进制数据, 还是字符串, 其末尾都带一个\0, 所以至少调用libc中的字符串输出函数是安全的.

在对SDS中的数据进行修改时, 若剩余空间不足, 会调用sdsMakeRoomFor函数用于扩容空间, 这是一个很低级的API, 通常情况下不应当由SDS的使用者直接调用. 其实现中核心的几行如下:

1
2
3
4
5
6
7
8
9
10
11
12
13
14
sds sdsMakeRoomFor(sds s, size_t addlen) {
...
/* Return ASAP if there is enough space left. */
if (avail >= addlen) return s;

len = sdslen(s);
sh = (char*)s-sdsHdrSize(oldtype);
newlen = (len+addlen);
if (newlen < SDS_MAX_PREALLOC)
newlen *= 2;
else
newlen += SDS_MAX_PREALLOC;
...
}

可以看到, 在扩充空间时

  • 先保证至少有addlen可用
  • 然后再进一步扩充, 在总体占用空间不超过阈值SDS_MAC_PREALLOC时, 申请空间再翻一倍. 若总体空间已经超过了阈值, 则步进增长SDS_MAC_PREALLOC. 这个阈值的默认值为 1024 * 1024

SDS也提供了接口用于移除所有未使用的内存空间. sdsRemoveFreeSpace, 该接口没有间接的被任何SDS其它接口调用, 即默认情况下, SDS不会自动回收预留空间. 在SDS的使用者需要节省内存时, 由使用者自行调用:

1
sds sdsRemoveFreeSpace(sds s);

总结:

  • SDS除了是某些Value Type的底层实现, 也被大量使用在Redis内部, 用于替代C-Style字符串. 所以默认的创建SDS实例接口, 不分配额外的预留空间. 因为多数字符串在程序运行期间是不变的. 而对于变更数据区的API, 其内部则是调用了 sdsMakeRoomFor, 每一次扩充空间, 都会预留大量的空间. 这样做的考量是: 如果一个SDS实例中的数据被变更了, 那么很有可能会在后续发生多次变更.
  • SDS的API内部不负责清除未使用的闲置内存空间, 因为内部API无法判断这样做的合适时机. 即便是在操作数据区的时候导致数据区占用内存减少时, 内部API也不会清除闲置内在空间. 清除闲置内存空间责任应当由SDS的使用者自行担当.
  • 用SDS替代C-Style字符串时, 由于其头部额外存储了数据区的长度信息, 所以字符串的求长操作时间复杂度为O(1)

2.2 list

这是普通的链表实现, 链表结点不直接持有数据, 而是通过void *指针来间接的指向数据. 其实现位于 src/adlist.h与src/adlist.c中, 关键定义如下:

1
2
3
4
5
6
7
8
9
10
11
12
13
14
15
16
17
18
19
typedef struct listNode {
struct listNode *prev;
struct listNode *next;
void *value;
} listNode;

typedef struct listIter {
listNode *next;
int direction;
} listIter;

typedef struct list {
listNode *head;
listNode *tail;
void *(*dup)(void *ptr);
void (*free)(void *ptr);
int (*match)(void *ptr, void *key);
unsigned long len;
} list;

其内存布局如下图所示:

这是一个平平无奇的链表的实现. list在Redis除了作为一些Value Type的底层实现外, 还广泛用于Redis的其它功能实现中, 作为一种数据结构工具使用. 在list的实现中, 除了基本的链表定义外, 还额外增加了:

  • 迭代器listIter的定义, 与相关接口的实现.
  • 由于list中的链表结点本身并不直接持有数据, 而是通过value字段, 以void *指针的形式间接持有, 所以数据的生命周期并不完全与链表及其结点一致. 这给了list的使用者相当大的灵活性. 比如可以多个结点持有同一份数据的地址. 但与此同时, 在对链表进行销毁, 结点复制以及查找匹配时, 就需要list的使用者将相关的函数指针赋值于list.dup, list.free, list.match字段.

2.3 dict

dict是Redis底层数据结构中实现最为复杂的一个数据结构, 其功能类似于C++标准库中的std::unordered_map, 其实现位于 src/dict.h 与 src/dict.c中, 其关键定义如下:

1
2
3
4
5
6
7
8
9
10
11
12
13
14
15
16
17
18
19
20
21
22
23
24
25
26
27
28
29
30
31
32
33
34
35
36
37
38
39
40
41
42
43
44
45
46
47
48
49
typedef struct dictEntry {
void *key;
union {
void *val;
uint64_t u64;
int64_t s64;
double d;
} v;
struct dictEntry *next;
} dictEntry;

typedef struct dictType {
uint64_t (*hashFunction)(const void *key);
void *(*keyDup)(void *privdata, const void *key);
void *(*valDup)(void *privdata, const void *obj);
int (*keyCompare)(void *privdata, const void *key1, const void *key2);
void (*keyDestructor)(void *privdata, void *key);
void (*valDestructor)(void *privdata, void *obj);
} dictType;

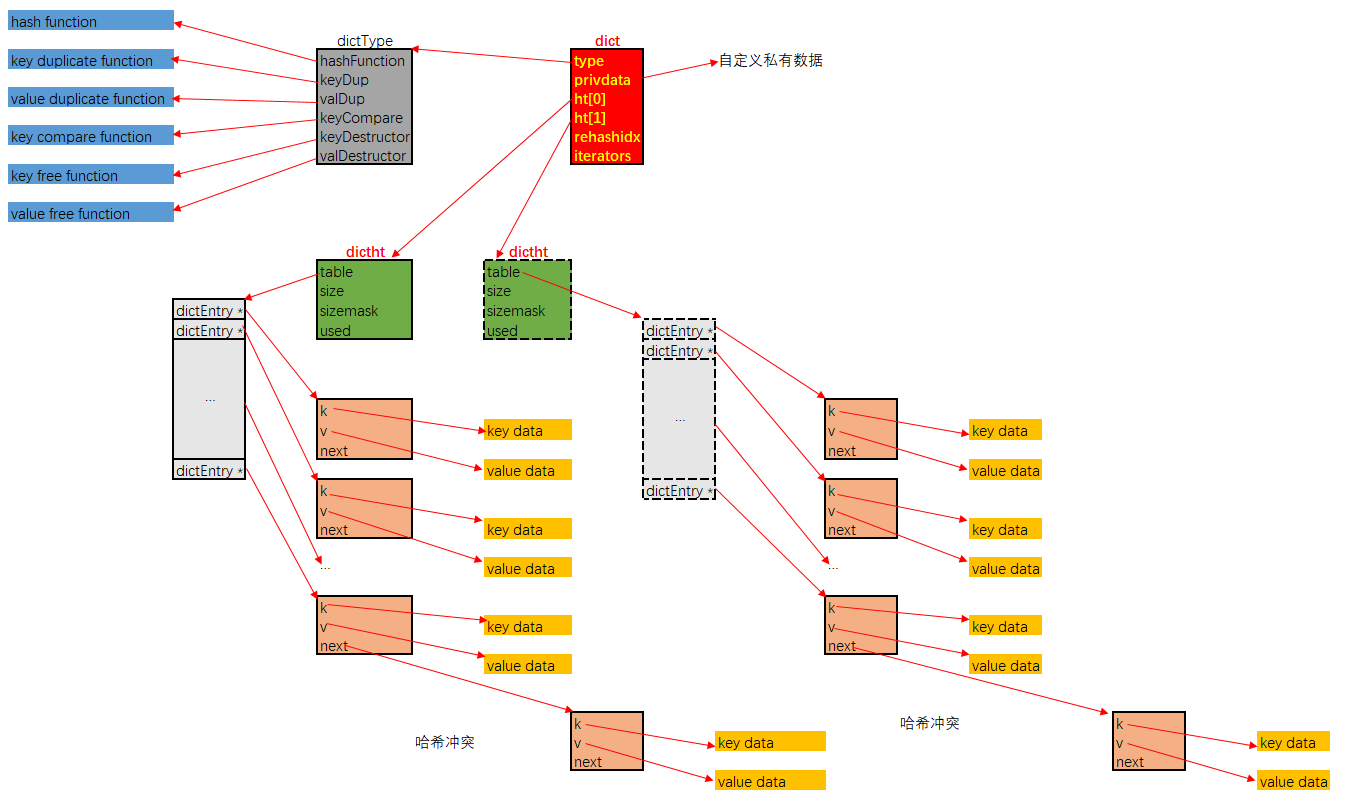
/* This is our hash table structure. Every dictionary has two of this as we
* implement incremental rehashing, for the old to the new table. */
typedef struct dictht {
dictEntry **table;
unsigned long size;
unsigned long sizemask;
unsigned long used;
} dictht;

typedef struct dict {
dictType *type;
void *privdata;
dictht ht[2];
long rehashidx; /* rehashing not in progress if rehashidx == -1 */
unsigned long iterators; /* number of iterators currently running */
} dict;

/* If safe is set to 1 this is a safe iterator, that means, you can call
* dictAdd, dictFind, and other functions against the dictionary even while
* iterating. Otherwise it is a non safe iterator, and only dictNext()
* should be called while iterating. */
typedef struct dictIterator {
dict *d;
long index;
int table, safe;
dictEntry *entry, *nextEntry;
/* unsafe iterator fingerprint for misuse detection. */
long long fingerprint;
} dictIterator;

其内存布局如下所示:

  • dict中存储的键值对, 是通过dictEntry这个结构间接持有的, k通过指针间接持有键, v通过指针间接持有值. 注意, 若值是整数值的话, 是直接存储在v字段中的, 而不是间接持有. 同时next指针用于指向, 在bucket索引值冲突时, 以链式方式解决冲突, 指向同索引的下一个dictEntry结构.

  • 传统的哈希表实现, 是一块连续空间的顺序表, 表中元素即是结点. 在dictht.table中, 结点本身是散布在内存中的, 顺序表中存储的是dictEntry的指针

  • 哈希表即是dictht结构, 其通过table字段间接的持有顺序表形式的bucket, bucket的容量存储在size字段中, 为了加速将散列值转化为bucket中的数组索引, 引入了sizemask字段, 计算指定键在哈希表中的索引时, 执行的操作类似于dict->type->hashFunction(键) & dict->ht[x].sizemask. 从这里也可以看出来, bucket的容量适宜于为2的幂次, 这样计算出的索引值能覆盖到所有bucket索引位.

  • dict即为字典. 其中type字段中存储的是本字典使用到的各种函数指针, 包括散列函数, 键与值的复制函数, 释放函数, 以及键的比较函数. privdata是用于存储用户自定义数据. 这样, 字典的使用者可以最大化的自定义字典的实现, 通过自定义各种函数实现, 以及可以附带私有数据, 保证了字典有很大的调优空间.

  • 字典为了支持平滑扩容, 定义了ht[2]这个数组字段. 其用意是这样的:

    1. 一般情况下, 字典dict仅持有一个哈希表dictht的实例, 即整个字典由一个bucket实现.
    2. 随着插入操作, bucket中出现冲突的概率会越来越大, 当字典中存储的结点数目, 与bucket数组长度的比值达到一个阈值(1:1)时, 字典为了缓解性能下降, 就需要扩容
    3. 扩容的操作是平滑的, 即在扩容时, 字典会持有两个dictht的实例, ht[0]指向旧哈希表, ht[1]指向扩容后的新哈希表. 平滑扩容的重点在于两个策略:
    4. 后续每一次的插入, 替换, 查找操作, 都插入到ht[1]指向的哈希表中
    5. 每一次插入, 替换, 查找操作执行时, 会将旧表ht[0]中的一个bucket索引位持有的结点链表, 迁移到ht[1]中去. 迁移的进度保存在rehashidx这个字段中.在旧表中由于冲突而被链接在同一索引位上的结点, 迁移到新表后, 可能会散布在多个新表索引中去.
    6. 当迁移完成后, ht[0]指向的旧表会被释放, 之后会将新表的持有权转交给ht[0], 再重置ht[1]指向NULL
  • 这种平滑扩容的优点有两个:

    1. 平滑扩容过程中, 所有结点的实际数据, 即dict->ht[0]->table[rehashindex]->k与dict->ht[0]->table[rehashindex]->v分别指向的实际数据, 内存地址都不会变化. 没有发生键数据与值数据的拷贝或移动, 扩容整个过程仅是各种指针的操作. 速度非常快
    2. 扩容操作是步进式的, 这保证任何一次插入操作都是顺畅的, dict的使用者是无感知的. 若扩容是一次性的, 当新旧bucket容量特别大时, 迁移所有结点必然会导致耗时陡增.

除了字典本身的实现外, 其中还顺带实现了一个迭代器, 这个迭代器中有字段safe以标示该迭代器是”安全迭代器”还是”非安全迭代器”, 所谓的安全与否, 指是的这种场景:
设想在运行迭代器的过程中, 字典正处于平滑扩容的过程中. 在平滑扩容的过程中时, 旧表一个索引位上的, 由冲突而链起来的多个结点, 迁移到新表后, 可能会散布到新表的多个索引位上. 且新的索引位的值可能比旧的索引位要低.

遍历操作的重点是, 保证在迭代器遍历操作开始时, 字典中持有的所有结点, 都会被遍历到. 而若在遍历过程中, 一个未遍历的结点, 从旧表迁移到新表后, 索引值减小了, 那么就可能会导致这个结点在遍历过程中被遗漏.

所以, 所谓的”安全”迭代器, 其在内部实现时: 在迭代过程中, 若字典正处于平滑扩容过程, 则暂停结点迁移, 直至迭代器运行结束. 这样虽然不能保证在迭代过程中插入的结点会被遍历到, 但至少保证在迭代起始时, 字典中持有的所有结点都会被遍历到.

这也是为什么dict结构中有一个iterators字段的原因: 该字段记录了运行于该字典上的安全迭代器的数目. 若该数目不为0, 字典是不会继续进行结点迁移平滑扩容的.

下面是字典的扩容操作中的核心代码, 我们以插入操作引起的扩容为例:

先是插入操作的外部逻辑:

  1. 如果插入时, 字典正处于平滑扩容过程中, 那么无论本次插入是否成功, 先迁移一个bucket索引中的结点至新表
  2. 在计算新插入结点键的bucket索引值时, 内部会探测哈希表是否需要扩容(若当前不在平滑扩容过程中)
1
2
3
4
5
6
7
8
9
10
11
12
13
14
15
16
17
18
19
20
21
22
23
24
25
26
27
28
29
30
31
32
33
34
35
36
37
38
39
int dictAdd(dict *d, void *key, void *val)
{
dictEntry *entry = dictAddRaw(d,key,NULL); // 调用dictAddRaw

if (!entry) return DICT_ERR;
dictSetVal(d, entry, val);
return DICT_OK;
}

dictEntry *dictAddRaw(dict *d, void *key, dictEntry **existing)
{
long index;
dictEntry *entry;
dictht *ht;

if (dictIsRehashing(d)) _dictRehashStep(d); // 若在平滑扩容过程中, 先步进迁移一个bucket索引

/* Get the index of the new element, or -1 if
* the element already exists. */

// 在计算键在bucket中的索引值时, 内部会检查是否需要扩容
if ((index = _dictKeyIndex(d, key, dictHashKey(d,key), existing)) == -1)
return NULL;

/* Allocate the memory and store the new entry.
* Insert the element in top, with the assumption that in a database
* system it is more likely that recently added entries are accessed
* more frequently. */
ht = dictIsRehashing(d) ? &d->ht[1] : &d->ht[0];
entry = zmalloc(sizeof(*entry));
entry->next = ht->table[index];
ht->table[index] = entry;
ht->used++;

/* Set the hash entry fields. */
dictSetKey(d, entry, key);
return entry;
}

下面是计算bucket索引值的函数, 内部会探测该哈希表是否需要扩容, 如果需要扩容(结点数目与bucket数组长度比例达到1:1), 就使字典进入平滑扩容过程:

1
2
3
4
5
6
7
8
9
10
11
12
13
14
15
16
17
18
19
20
21
22
23
24
25
26
27
28
29
30
31
32
33
34
35
36
37
38
39
40
41
42
43
44
45
46
47
48
49
50
51
52
53
54
55
56
57
58
59
60
61
62
63
64
65
66
67
68
69
70
71
72
73
74
75
76
77
78
79
80
81
82
static long _dictKeyIndex(dict *d, const void *key, uint64_t hash, dictEntry **existing)
{
unsigned long idx, table;
dictEntry *he;
if (existing) *existing = NULL;

/* Expand the hash table if needed */
if (_dictExpandIfNeeded(d) == DICT_ERR) // 探测是否需要扩容, 如果需要, 则开始扩容
return -1;
for (table = 0; table <= 1; table++) {
idx = hash & d->ht[table].sizemask;
/* Search if this slot does not already contain the given key */
he = d->ht[table].table[idx];
while(he) {
if (key==he->key || dictCompareKeys(d, key, he->key)) {
if (existing) *existing = he;
return -1;
}
he = he->next;
}
if (!dictIsRehashing(d)) break;
}
return idx;
}

/* Expand the hash table if needed */
static int _dictExpandIfNeeded(dict *d)
{
/* Incremental rehashing already in progress. Return. */
if (dictIsRehashing(d)) return DICT_OK; // 如果正在扩容过程中, 则什么也不做

/* If the hash table is empty expand it to the initial size. */
// 若字典中本无元素, 则初始化字典, 初始化时的bucket数组长度为4
if (d->ht[0].size == 0) return dictExpand(d, DICT_HT_INITIAL_SIZE);

/* If we reached the 1:1 ratio, and we are allowed to resize the hash
* table (global setting) or we should avoid it but the ratio between
* elements/buckets is over the "safe" threshold, we resize doubling
* the number of buckets. */
// 若字典中元素的个数与bucket数组长度比值大于1:1时, 则调用dictExpand进入平滑扩容状态
if (d->ht[0].used >= d->ht[0].size &&
(dict_can_resize ||
d->ht[0].used/d->ht[0].size > dict_force_resize_ratio))
{
return dictExpand(d, d->ht[0].used*2);
}
return DICT_OK;
}

int dictExpand(dict *d, unsigned long size)
{
dictht n; /* the new hash table */ // 新建一个dictht结构
unsigned long realsize = _dictNextPower(size);

/* the size is invalid if it is smaller than the number of
* elements already inside the hash table */
if (dictIsRehashing(d) || d->ht[0].used > size)
return DICT_ERR;

/* Rehashing to the same table size is not useful. */
if (realsize == d->ht[0].size) return DICT_ERR;

/* Allocate the new hash table and initialize all pointers to NULL */
n.size = realsize;
n.sizemask = realsize-1;
n.table = zcalloc(realsize*sizeof(dictEntry*));// 初始化dictht下的table, 即bucket数组
n.used = 0;

/* Is this the first initialization? If so it's not really a rehashing
* we just set the first hash table so that it can accept keys. */
// 若是新字典初始化, 直接把dictht结构挂在ht[0]中
if (d->ht[0].table == NULL) {
d->ht[0] = n;
return DICT_OK;
}

// 否则, 把新dictht结构挂在ht[1]中, 并开启平滑扩容(置rehashidx为0, 字典处于非扩容状态时, 该字段值为-1)
/* Prepare a second hash table for incremental rehashing */
d->ht[1] = n;
d->rehashidx = 0;
return DICT_OK;
}

下面是平滑扩容的实现:

1
2
3
4
5
6
7
8
9
10
11
12
13
14
15
16
17
18
19
20
21
22
23
24
25
26
27
28
29
30
31
32
33
34
35
36
37
38
39
40
41
42
43
44
45
46
47
48
49
50
51
52
53
54
55
56
static void _dictRehashStep(dict *d) {
// 若字典上还运行着安全迭代器, 则不迁移结点
// 否则每次迁移一个旧bucket索引上的所有结点
if (d->iterators == 0) dictRehash(d,1);
}

int dictRehash(dict *d, int n) {
int empty_visits = n*10; /* Max number of empty buckets to visit. */
if (!dictIsRehashing(d)) return 0;

while(n-- && d->ht[0].used != 0) {
dictEntry *de, *nextde;

/* Note that rehashidx can't overflow as we are sure there are more
* elements because ht[0].used != 0 */
assert(d->ht[0].size > (unsigned long)d->rehashidx);
// 在旧bucket中, 找到下一个非空的索引位
while(d->ht[0].table[d->rehashidx] == NULL) {
d->rehashidx++;
if (--empty_visits == 0) return 1;
}
// 取出该索引位上的结点链表
de = d->ht[0].table[d->rehashidx];
/* Move all the keys in this bucket from the old to the new hash HT */
// 把所有结点迁移到新bucket中去
while(de) {
uint64_t h;

nextde = de->next;
/* Get the index in the new hash table */
h = dictHashKey(d, de->key) & d->ht[1].sizemask;
de->next = d->ht[1].table[h];
d->ht[1].table[h] = de;
d->ht[0].used--;
d->ht[1].used++;
de = nextde;
}
d->ht[0].table[d->rehashidx] = NULL;
d->rehashidx++;
}

/* Check if we already rehashed the whole table... */
// 检查是否旧表中的所有结点都被迁移到了新表
// 如果是, 则置先释放原旧bucket数组, 再置ht[1]为ht[0]
// 最后再置rehashidx=-1, 以示字典不处于平滑扩容状态
if (d->ht[0].used == 0) {
zfree(d->ht[0].table);
d->ht[0] = d->ht[1];
_dictReset(&d->ht[1]);
d->rehashidx = -1;
return 0;
}

/* More to rehash... */
return 1;
}

总结:

字典的实现很复杂, 主要是实现了平滑扩容逻辑
用户数据均是以指针形式间接由dictEntry结构持有, 故在平滑扩容过程中, 不涉及用户数据的拷贝
有安全迭代器可用, 安全迭代器保证, 在迭代起始时, 字典中的所有结点, 都会被迭代到, 即使在迭代过程中对字典有插入操作
字典内部使用的默认散列函数其实也非常有讲究, 不过限于篇幅, 这里不展开讲. 并且字典的实现给了使用者非常大的灵活性(dictType结构与dict.privdata字段), 对于一些特定场合使用的键数据, 用户可以自行选择更高效更特定化的散列函数

2.4 zskiplist

zskiplist是Redis实现的一种特殊的跳跃表. 跳跃表是一种基于线性表实现简单的搜索结构, 其最大的特点就是: 实现简单, 性能能逼近各种搜索树结构. 血统纯正的跳跃表的介绍在维基百科中即可查阅. 在Redis中, 在原版跳跃表的基础上, 进行了一些小改动, 即是现在要介绍的zskiplist结构.

其定义在src/server.h中, 如下:

1
2
3
4
5
6
7
8
9
10
11
12
13
14
15
16
/* ZSETs use a specialized version of Skiplists */
typedef struct zskiplistNode {
sds ele;
double score;
struct zskiplistNode *backward;
struct zskiplistLevel {
struct zskiplistNode *forward;
unsigned int span;
} level[];
} zskiplistNode;

typedef struct zskiplist {
struct zskiplistNode *header, *tail;
unsigned long length;
int level;
} zskiplist;

其内存布局如下图:

zskiplist的核心设计要点为:

  1. 头结点不持有任何数据, 且其level[]的长度为32
  2. 每个结点, 除了持有数据的ele字段, 还有一个字段score, 其标示着结点的得分, 结点之间凭借得分来判断先后顺序, 跳跃表中的结点按结点的得分升序排列.
  3. 每个结点持有一个backward指针, 这是原版跳跃表中所没有的. 该指针指向结点的前一个紧邻结点.
  4. 每个结点中最多持有32个zskiplistLevel结构. 实际数量在结点创建时, 按幂次定律随机生成(不超过32). 每个zskiplistLevel中有两个字段.
  5. forward字段指向比自己得分高的某个结点(不一定是紧邻的), 并且, 若当前zskiplistLevel实例在level[]中的索引为X, 则其forward字段指向的结点, 其level[]字段的容量至少是X+1. 这也是上图中, 为什么forward指针总是画的水平的原因.
  6. span字段代表forward字段指向的结点, 距离当前结点的距离. 紧邻的两个结点之间的距离定义为1.
  7. zskiplist中持有字段level, 用以记录所有结点(除过头结点外), level[]数组最长的长度.

跳跃表主要用于, 在给定一个分值的情况下, 查找与该分值最接近的结点. 搜索时, 伪代码如下:

1
2
3
4
5
6
7
8
9
10
11
12
13
14
15
16
17
18
19
20
21
22
23
24
int level = zskiplist->level - 1;
zskiplistNode p = zskiplist->head;

while(1 && p)
{
zskiplistNode q = (p->level)[level]->forward:
if(q->score > 分值)
{
if(level > 0)
{
level--;
}
else
{
return :
q为整个跳跃表中, 分值大于指定分值的第一个结点
q->backward为整个跳跃表中, 分值小于或等于指定分值的最后一个结点
}
}
else
{
p = q;
}
}

跳跃表的实现比较简单, 最复杂的操作即是插入与删除结点, 需要仔细处理邻近结点的所有level[]中的所有zskiplistLevel结点中的forward与span的值的变更.

另外, 关于新创建的结点, 其level[]数组长度的随机算法, 在接口zslInsert的实现中, 核心代码片断如下:

1
2
3
4
5
6
7
8
9
10
11
12
13
14
15
16
17
18
19
20
21
22
23
24
25
26
27
28
29
30
31
32
33
34
35
zskiplistNode *zslInsert(zskiplist *zsl, double score, sds ele) {
//...

level = zslRandomLevel(); // 随机生成新结点的, level[]数组的长度
if (level > zsl->level) {
// 若生成的新结点的level[]数组的长度比当前表中所有结点的level[]的长度都大
// 那么头结点中需要新增几个指向该结点的指针
// 并刷新ziplist中的level字段
for (i = zsl->level; i < level; i++) {
rank[i] = 0;
update[i] = zsl->header;
update[i]->level[i].span = zsl->length;
}
zsl->level = level;
}
x = zslCreateNode(level,score,ele); // 创建新结点
//... 执行插入操作
}

// 按幂次定律生成小于32的随机数的函数
// 宏 ZSKIPLIST_MAXLEVEL 的定义为32, 宏 ZSKIPLIST_P 被设定为 0.25
// 即
// level == 1的概率为 75%
// level == 2的概率为 75% * 25%
// level == 3的概率为 75% * 25% * 25%
// ...
// level == 31的概率为 0.75 * 0.25^30
// 而
// level == 32的概率为 0.75 * sum(i = 31 ~ +INF){ 0.25^i }
int zslRandomLevel(void) {
int level = 1;
while ((random()&0xFFFF) < (ZSKIPLIST_P * 0xFFFF))
level += 1;
return (level<ZSKIPLIST_MAXLEVEL) ? level : ZSKIPLIST_MAXLEVEL;
}

2.5 intset

这是一个用于存储在序的整数的数据结构, 也底层数据结构中最简单的一个, 其定义与实现在src/intest.h与src/intset.c中, 关键定义如下:

1
2
3
4
5
6
7
8
9
typedef struct intset {
uint32_t encoding;
uint32_t length;
int8_t contents[];
} intset;

#define INTSET_ENC_INT16 (sizeof(int16_t))
#define INTSET_ENC_INT32 (sizeof(int32_t))
#define INTSET_ENC_INT64 (sizeof(int64_t))

inset结构中的encoding的取值有三个, 分别是宏INTSET_ENC_INT16, INTSET_ENC_INT32, INTSET_ENC_INT64. length代表其中存储的整数的个数, contents指向实际存储数值的连续内存区域. 其内存布局如下图所示:

  • intset中各字段, 包括contents中存储的数值, 都是以主机序(小端字节序)存储的. 这意味着Redis若运行在PPC这样的大端字节序的机器上时, 存取数据都会有额外的字节序转换开销
  • 当encoding == INTSET_ENC_INT16时, contents中以int16_t的形式存储着数值. 类似的, 当encoding == INTSET_ENC_INT32时, contents中以int32_t的形式存储着数值.
  • 但凡有一个数值元素的值超过了int32_t的取值范围, 整个intset都要进行升级, 即所有的数值都需要以int64_t的形式存储. 显然升级的开销是很大的.
  • intset中的数值是以升序排列存储的, 插入与删除的复杂度均为O(n). 查找使用二分法, 复杂度为O(log_2(n))
  • intset的代码实现中, 不预留空间, 即每一次插入操作都会调用zrealloc接口重新分配内存. 每一次删除也会调用zrealloc接口缩减占用的内存. 省是省了, 但内存操作的时间开销上升了.
  • intset的编码方式一经升级, 不会再降级.

总之, intset适合于如下数据的存储:

  • 所有数据都位于一个稳定的取值范围中. 比如均位于int16_t或int32_t的取值范围中
  • 数据稳定, 插入删除操作不频繁. 能接受O(lgn)级别的查找开销

2.6 ziplist

ziplist是Redis底层数据结构中, 最苟的一个结构. 它的设计宗旨就是: 省内存, 从牙缝里省内存. 设计思路和TLV一致, 但为了从牙缝里节省内存, 做了很多额外工作.

ziplist的内存布局与intset一样: 就是一块连续的内存空间. 但区域划分比较复杂, 概览如下图:

  • 和intset一样, ziplist中的所有值都是以小端序存储的
  • zlbytes字段的类型是uint32_t, 这个字段中存储的是整个ziplist所占用的内存的字节数
  • zltail字段的类型是uint32_t, 它指的是ziplist中最后一个entry的偏移量. 用于快速定位最后一个entry, 以快速完成pop等操作
  • zllen字段的类型是uint16_t, 它指的是整个ziplit中entry的数量. 这个值只占16位, 所以蛋疼的地方就来了: 如果ziplist中entry的数目小于65535, 那么该字段中存储的就是实际entry的值. 若等于或超过65535, 那么该字段的值固定为65535, 但实际数量需要一个个entry的去遍历所有entry才能得到.
  • zlend是一个终止字节, 其值为全F, 即0xff. ziplist保证任何情况下, 一个entry的首字节都不会是255

在画图展示entry的内存布局之前, 先讲一下entry中都存储了哪些信息:

  • 每个entry中存储了它前一个entry所占用的字节数. 这样支持ziplist反向遍历.
  • 每个entry用单独的一块区域, 存储着当前结点的类型: 所谓的类型, 包括当前结点存储的数据是什么(二进制, 还是数值), 如何编码(如果是数值, 数值如何存储, 如果是二进制数据, 二进制数据的长度)
  • 最后就是真实的数据了

entry的内存布局如下所示:

prevlen即是”前一个entry所占用的字节数”, 它本身是一个变长字段, 规约如下:

  • 若前一个entry占用的字节数小于 254, 则prevlen字段占一字节
  • 若前一个entry占用的字节数等于或大于 254, 则prevlen字段占五字节: 第一个字节值为 254, 即0xfe, 另外四个字节, 以uint32_t存储着值.

encoding字段的规约就复杂了许多

  • 若数据是二进制数据, 且二进制数据长度小于64字节(不包括64), 那么encoding占一字节. 在这一字节中, 高两位值固定为0, 低六位值以无符号整数的形式存储着二进制数据的长度. 即 00xxxxxx, 其中低六位bitxxxxxx是用二进制保存的数据长度.
  • 若数据是二进制数据, 且二进制数据长度大于或等于64字节, 但小于16384(不包括16384)字节, 那么encoding占用两个字节. 在这两个字节16位中, 第一个字节的高两位固定为01, 剩余的14个位, 以小端序无符号整数的形式存储着二进制数据的长度, 即 01xxxxxx, yyyyyyyy, 其中yyyyyyyy是高八位, xxxxxx是低六位.
  • 若数据是二进制数据, 且二进制数据的长度大于或等于16384字节, 但小于2^32-1字节, 则encoding占用五个字节. 第一个字节是固定值10000000, 剩余四个字节, 按小端序uint32_t的形式存储着二进制数据的长度. 这也是ziplist能存储的二进制数据的最大长度, 超过2^32-1字节的二进制数据, ziplist无法存储.
  • 若数据是整数值, 则encoding和data的规约如下:
    1. 首先, 所有存储数值的entry, 其encoding都仅占用一个字节. 并且最高两位均是11
    2. 若数值取值范围位于[0, 12]中, 则encoding和data挤在同一个字节中. 即为1111 0001~1111 1101, 高四位是固定值, 低四位的值从0001至1101, 分别代表 0 ~ 12这十五个数值
    3. 若数值取值范围位于[-128, -1] [13, 127]中, 则encoding == 0b 1111 1110. 数值存储在紧邻的下一个字节, 以int8_t形式编码
    4. 若数值取值范围位于[-32768, -129] [128, 32767]中, 则encoding == 0b 1100 0000. 数值存储在紧邻的后两个字节中, 以小端序int16_t形式编码
    5. 若数值取值范围位于[-8388608, -32769] [32768, 8388607]中, 则encoding == 0b 1111 0000. 数值存储在紧邻的后三个字节中, 以小端序存储, 占用三个字节.
    6. 若数值取值范围位于[-2^31, -8388609] [8388608, 2^31 - 1]中, 则encoding == 0b 1101 0000. 数值存储在紧邻的后四个字节中, 以小端序int32_t形式编码
    7. 若数值取值均不在上述范围, 但位于int64_t所能表达的范围内, 则encoding == 0b 1110 0000, 数值存储在紧邻的后八个字节中, 以小端序int64_t形式编码

在大规模数值存储中, ziplist几乎不浪费内存空间, 其苟的程序到达了字节级别, 甚至对于[0, 12]区间的数值, 连data里的那一个字节也要省下来. 显然, ziplist是一种特别节省内存的数据结构, 但它的缺点也十分明显:

  • 和intset一样, ziplist也不预留内存空间, 并且在移除结点后, 也是立即缩容, 这代表每次写操作都会进行内存分配操作.
  • ziplist最蛋疼的一个问题是: 结点如果扩容, 导致结点占用的内存增长, 并且超过254字节的话, 可能会导致链式反应: 其后一个结点的entry.prevlen需要从一字节扩容至五字节. 最坏情况下, 第一个结点的扩容, 会导致整个ziplist表中的后续所有结点的entry.prevlen字段扩容. 虽然这个内存重分配的操作依然只会发生一次, 但代码中的时间复杂度是o(N)级别, 因为链式扩容只能一步一步的计算. 但这种情况的概率十分的小, 一般情况下链式扩容能连锁反映五六次就很不幸了. 之所以说这是一个蛋疼问题, 是因为, 这样的坏场景下, 其实时间复杂度并不高: 依次计算每个entry新的空间占用, 也就是o(N), 总体占用计算出来后, 只执行一次内存重分配, 与对应的memmove操作, 就可以了. 蛋疼说的是: 代码特别难写, 难读. 下面放一段处理插入结点时处理链式反应的代码片断, 大家自行感受一下:
1
2
3
4
5
6
7
8
9
10
11
12
13
14
15
16
17
18
19
20
21
22
23
24
25
26
27
28
29
30
31
32
33
34
35
36
37
38
39
40
41
42
43
44
45
46
47
48
49
50
51
52
53
54
55
56
57
58
59
60
61
62
63
64
65
66
67
68
69
70
71
72
73
74
75
76
77
78
79
80
81
82
83
84
85
86
87
88
89
90
91
92
93
94
95
96
97
98
99
100
101
102
103
104
105
106
107
108
109
110
111
112
113
114
115
116
117
118
119
120
121
122
123
124
125
126
127
128
129
130
131
132
133
134
135
136
137
138
139
140
141
142
143
144
145
146
147
148
149
150
151
152
153
154
155
156
157
158
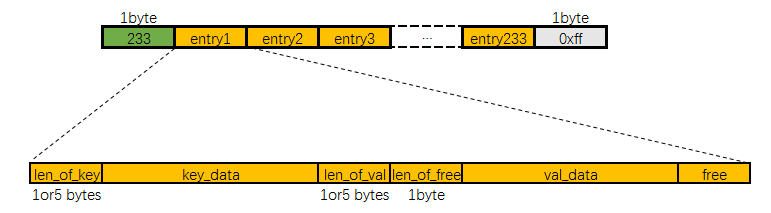
unsigned char *__ziplistInsert(unsigned char *zl, unsigned char *p, unsigned char *s, unsigned int slen) {
size_t curlen = intrev32ifbe(ZIPLIST_BYTES(zl)), reqlen;
unsigned int prevlensize, prevlen = 0;
size_t offset;
int nextdiff = 0;
unsigned char encoding = 0;
long long value = 123456789; /* initialized to avoid warning. Using a value
that is easy to see if for some reason
we use it uninitialized. */
zlentry tail;

/* Find out prevlen for the entry that is inserted. */
if (p[0] != ZIP_END) {
ZIP_DECODE_PREVLEN(p, prevlensize, prevlen);
} else {
unsigned char *ptail = ZIPLIST_ENTRY_TAIL(zl);
if (ptail[0] != ZIP_END) {
prevlen = zipRawEntryLength(ptail);
}
}

/* See if the entry can be encoded */
if (zipTryEncoding(s,slen,&value,&encoding)) {
/* 'encoding' is set to the appropriate integer encoding */
reqlen = zipIntSize(encoding);
} else {
/* 'encoding' is untouched, however zipStoreEntryEncoding will use the
* string length to figure out how to encode it. */
reqlen = slen;
}
/* We need space for both the length of the previous entry and
* the length of the payload. */
reqlen += zipStorePrevEntryLength(NULL,prevlen);
reqlen += zipStoreEntryEncoding(NULL,encoding,slen);

/* When the insert position is not equal to the tail, we need to
* make sure that the next entry can hold this entry's length in
* its prevlen field. */
int forcelarge = 0;
nextdiff = (p[0] != ZIP_END) ? zipPrevLenByteDiff(p,reqlen) : 0;
if (nextdiff == -4 && reqlen < 4) {
nextdiff = 0;
forcelarge = 1;
}

/* Store offset because a realloc may change the address of zl. */
offset = p-zl;
zl = ziplistResize(zl,curlen+reqlen+nextdiff);
p = zl+offset;

/* Apply memory move when necessary and update tail offset. */
if (p[0] != ZIP_END) {
/* Subtract one because of the ZIP_END bytes */
memmove(p+reqlen,p-nextdiff,curlen-offset-1+nextdiff);

/* Encode this entry's raw length in the next entry. */
if (forcelarge)
zipStorePrevEntryLengthLarge(p+reqlen,reqlen);
else
zipStorePrevEntryLength(p+reqlen,reqlen);

/* Update offset for tail */
ZIPLIST_TAIL_OFFSET(zl) =
intrev32ifbe(intrev32ifbe(ZIPLIST_TAIL_OFFSET(zl))+reqlen);

/* When the tail contains more than one entry, we need to take
* "nextdiff" in account as well. Otherwise, a change in the
* size of prevlen doesn't have an effect on the *tail* offset. */
zipEntry(p+reqlen, &tail);
if (p[reqlen+tail.headersize+tail.len] != ZIP_END) {
ZIPLIST_TAIL_OFFSET(zl) =
intrev32ifbe(intrev32ifbe(ZIPLIST_TAIL_OFFSET(zl))+nextdiff);
}
} else {
/* This element will be the new tail. */
ZIPLIST_TAIL_OFFSET(zl) = intrev32ifbe(p-zl);
}

/* When nextdiff != 0, the raw length of the next entry has changed, so
* we need to cascade the update throughout the ziplist */
if (nextdiff != 0) {
offset = p-zl;
zl = __ziplistCascadeUpdate(zl,p+reqlen);
p = zl+offset;
}

/* Write the entry */
p += zipStorePrevEntryLength(p,prevlen);
p += zipStoreEntryEncoding(p,encoding,slen);
if (ZIP_IS_STR(encoding)) {
memcpy(p,s,slen);
} else {
zipSaveInteger(p,value,encoding);
}
ZIPLIST_INCR_LENGTH(zl,1);
return zl;
}

unsigned char *__ziplistCascadeUpdate(unsigned char *zl, unsigned char *p) {
size_t curlen = intrev32ifbe(ZIPLIST_BYTES(zl)), rawlen, rawlensize;
size_t offset, noffset, extra;
unsigned char *np;
zlentry cur, next;

while (p[0] != ZIP_END) {
zipEntry(p, &cur);
rawlen = cur.headersize + cur.len;
rawlensize = zipStorePrevEntryLength(NULL,rawlen);

/* Abort if there is no next entry. */
if (p[rawlen] == ZIP_END) break;
zipEntry(p+rawlen, &next);

/* Abort when "prevlen" has not changed. */
if (next.prevrawlen == rawlen) break;

if (next.prevrawlensize < rawlensize) {
/* The "prevlen" field of "next" needs more bytes to hold
* the raw length of "cur". */
offset = p-zl;
extra = rawlensize-next.prevrawlensize;
zl = ziplistResize(zl,curlen+extra);
p = zl+offset;

/* Current pointer and offset for next element. */
np = p+rawlen;
noffset = np-zl;

/* Update tail offset when next element is not the tail element. */
if ((zl+intrev32ifbe(ZIPLIST_TAIL_OFFSET(zl))) != np) {
ZIPLIST_TAIL_OFFSET(zl) =
intrev32ifbe(intrev32ifbe(ZIPLIST_TAIL_OFFSET(zl))+extra);
}

/* Move the tail to the back. */
memmove(np+rawlensize,
np+next.prevrawlensize,
curlen-noffset-next.prevrawlensize-1);
zipStorePrevEntryLength(np,rawlen);

/* Advance the cursor */
p += rawlen;
curlen += extra;
} else {
if (next.prevrawlensize > rawlensize) {
/* This would result in shrinking, which we want to avoid.
* So, set "rawlen" in the available bytes. */
zipStorePrevEntryLengthLarge(p+rawlen,rawlen);
} else {
zipStorePrevEntryLength(p+rawlen,rawlen);
}

/* Stop here, as the raw length of "next" has not changed. */
break;
}
}
return zl;
}

这种代码的特点就是: 最好由作者去维护, 最好一次性写对. 因为读起来真的费劲, 改起来也很费劲.

2.7 quicklist

如果说ziplist是整个Redis中为了节省内存, 而写的最苟的数据结构, 那么称quicklist就是在最苟的基础上, 再苟了一层. 这个结构是Redis在3.2版本后新加的, 在3.2版本之前, 我们可以讲, dict是最复杂的底层数据结构, ziplist是最苟的底层数据结构. 在3.2版本之后, 这两个记录被双双刷新了.

这是一种, 以ziplist为结点的, 双端链表结构. 宏观上, quicklist是一个链表, 微观上, 链表中的每个结点都是一个ziplist.

它的定义与实现分别在src/quicklist.h与src/quicklist.c中, 其中关键定义如下:

1
2
3
4
5
6
7
8
9
10
11
12
13
14
15
16
17
18
19
20
21
22
23
24
25
26
27
28
29
30
31
32
33
34
35
36
37
38
39
40
41
42
43
44
45
46
47
48
49
50
51
52
53
54
55
56
57
58
59
60
61
62
63
64
65
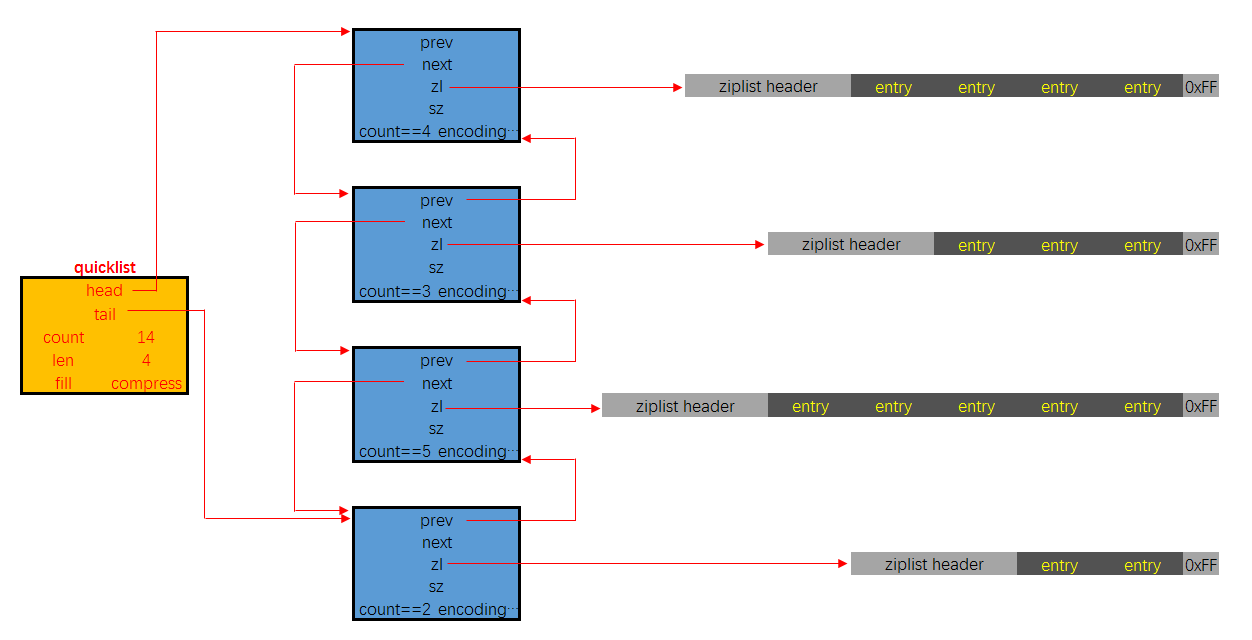
/* Node, quicklist, and Iterator are the only data structures used currently. */

/* quicklistNode is a 32 byte struct describing a ziplist for a quicklist.
* We use bit fields keep the quicklistNode at 32 bytes.
* count: 16 bits, max 65536 (max zl bytes is 65k, so max count actually < 32k).
* encoding: 2 bits, RAW=1, LZF=2.
* container: 2 bits, NONE=1, ZIPLIST=2.
* recompress: 1 bit, bool, true if node is temporarry decompressed for usage.
* attempted_compress: 1 bit, boolean, used for verifying during testing.
* extra: 12 bits, free for future use; pads out the remainder of 32 bits */
typedef struct quicklistNode {
struct quicklistNode *prev;
struct quicklistNode *next;
unsigned char *zl;
unsigned int sz; /* ziplist size in bytes */
unsigned int count : 16; /* count of items in ziplist */
unsigned int encoding : 2; /* RAW==1 or LZF==2 */
unsigned int container : 2; /* NONE==1 or ZIPLIST==2 */
unsigned int recompress : 1; /* was this node previous compressed? */
unsigned int attempted_compress : 1; /* node can't compress; too small */
unsigned int extra : 10; /* more bits to steal for future usage */
} quicklistNode;

/* quicklistLZF is a 4+N byte struct holding 'sz' followed by 'compressed'.
* 'sz' is byte length of 'compressed' field.
* 'compressed' is LZF data with total (compressed) length 'sz'
* NOTE: uncompressed length is stored in quicklistNode->sz.
* When quicklistNode->zl is compressed, node->zl points to a quicklistLZF */
typedef struct quicklistLZF {
unsigned int sz; /* LZF size in bytes*/
char compressed[];
} quicklistLZF;

/* quicklist is a 40 byte struct (on 64-bit systems) describing a quicklist.
* 'count' is the number of total entries.
* 'len' is the number of quicklist nodes.
* 'compress' is: -1 if compression disabled, otherwise it's the number
* of quicklistNodes to leave uncompressed at ends of quicklist.
* 'fill' is the user-requested (or default) fill factor. */
typedef struct quicklist {
quicklistNode *head;
quicklistNode *tail;
unsigned long count; /* total count of all entries in all ziplists */
unsigned long len; /* number of quicklistNodes */
int fill : 16; /* fill factor for individual nodes */
unsigned int compress : 16; /* depth of end nodes not to compress;0=off */
} quicklist;

typedef struct quicklistIter {
const quicklist *quicklist;
quicklistNode *current;
unsigned char *zi;
long offset; /* offset in current ziplist */
int direction;
} quicklistIter;

typedef struct quicklistEntry {
const quicklist *quicklist;
quicklistNode *node;
unsigned char *zi;
unsigned char *value;
long long longval;
unsigned int sz;
int offset;
} quicklistEntry;

这里定义了五个结构体:

  • quicklistNode, 宏观上, quicklist是一个链表, 这个结构描述的就是链表中的结点. 它通过zl字段持有底层的ziplist. 简单来讲, 它描述了一个ziplist实例
  • quicklistLZF, ziplist是一段连续的内存, 用LZ4算法压缩后, 就可以包装成一个quicklistLZF结构. 是否压缩quicklist中的每个ziplist实例是一个可配置项. 若这个配置项是开启的, 那么quicklistNode.zl字段指向的就不是一个ziplist实例, 而是一个压缩后的quicklistLZF实例
  • quicklist. 这就是一个双链表的定义. head, tail分别指向头尾指针. len代表链表中的结点. count指的是整个quicklist中的所有ziplist中的entry的数目. fill字段影响着每个链表结点中ziplist的最大占用空间, compress影响着是否要对每个ziplist以LZ4算法进行进一步压缩以更节省内存空间.
  • quicklistIter是一个迭代器
  • quicklistEntry是对ziplist中的entry概念的封装. quicklist作为一个封装良好的数据结构, 不希望使用者感知到其内部的实现, 所以需要把ziplist.entry的概念重新包装一下.

quicklist的内存布局图如下所示:

下面是有关quicklist的更多额外信息:

quicklist.fill的值影响着每个链表结点中, ziplist的长度.

  1. 当数值为负数时, 代表以字节数限制单个ziplist的最大长度. 具体为:
    1. -1 不超过4kb
    2. -2 不超过 8kb
    3. -3 不超过 16kb
    4. -4 不超过 32kb
    5. -5 不超过 64kb
    6. 当数值为正数时, 代表以entry数目限制单个ziplist的长度. 值即为数目. 由于该字段仅占16位, 所以以entry数目限制ziplist的容量时, 最大值为2^15个
  2. quicklist.compress的值影响着quicklistNode.zl字段指向的是原生的ziplist, 还是经过压缩包装后的quicklistLZF
    1. 0 表示不压缩, zl字段直接指向ziplist
    2. 1 表示quicklist的链表头尾结点不压缩, 其余结点的zl字段指向的是经过压缩后的quicklistLZF
    3. 2 表示quicklist的链表头两个, 与末两个结点不压缩, 其余结点的zl字段指向的是经过压缩后的quicklistLZF
    4. 以此类推, 最大值为2^16
  3. quicklistNode.encoding字段, 以指示本链表结点所持有的ziplist是否经过了压缩. 1代表未压缩, 持有的是原生的ziplist, 2代表压缩过
  4. quicklistNode.container字段指示的是每个链表结点所持有的数据类型是什么. 默认的实现是ziplist, 对应的该字段的值是2, 目前Redis没有提供其它实现. 所以实际上, 该字段的值恒为2
  5. quicklistNode.recompress字段指示的是当前结点所持有的ziplist是否经过了解压. 如果该字段为1即代表之前被解压过, 且需要在下一次操作时重新压缩.

quicklist的具体实现代码篇幅很长, 这里就不贴代码片断了, 从内存布局上也能看出来, 由于每个结点持有的ziplist是有上限长度的, 所以在与操作时要考虑的分支情况比较多. 想想都蛋疼.

quicklist有自己的优点, 也有缺点, 对于使用者来说, 其使用体验类似于线性数据结构, list作为最传统的双链表, 结点通过指针持有数据, 指针字段会耗费大量内存. ziplist解决了耗费内存这个问题. 但引入了新的问题: 每次写操作整个ziplist的内存都需要重分配. quicklist在两者之间做了一个平衡. 并且使用者可以通过自定义quicklist.fill, 根据实际业务情况, 经验主义调参.

2.8 zipmap

dict作为字典结构, 优点很多, 扩展性强悍, 支持平滑扩容等等, 但对于字典中的键值均为二进制数据, 且长度都很小时, dict的中的一坨指针会浪费不少内存, 因此Redis又实现了一个轻量级的字典, 即为zipmap.

zipmap适合使用的场合是:

  • 键值对量不大, 单个键, 单个值长度小
  • 键值均是二进制数据, 而不是复合结构或复杂结构. dict支持各种嵌套, 字典本身并不持有数据, 而仅持有数据的指针. 但zipmap是直接持有数据的.

zipmap的定义与实现在src/zipmap.h与src/zipmap.c两个文件中, 其定义与实现均未定义任何struct结构体, 因为zipmap的内存布局就是一块连续的内存空间. 其内存布局如下所示:

  • zipmap起始的第一个字节存储的是zipmap中键值对的个数. 如果键值对的个数大于254的话, 那么这个字节的值就是固定值254, 真实的键值对个数需要遍历才能获得.
  • zipmap的最后一个字节是固定值0xFF
  • zipmap中的每一个键值对, 称为一个entry, 其内存占用如上图, 分别六部分:
    1. len_of_key, 一字节或五字节. 存储的是键的二进制长度. 如果长度小于254, 则用1字节存储, 否则用五个字节存储, 第一个字节的值固定为0xFE, 后四个字节以小端序uint32_t类型存储着键的二进制长度.
    2. key_data为键的数据
    3. len_of_val, 一字节或五字节, 存储的是值的二进制长度. 编码方式同len_of_key
    4. len_of_free, 固定值1字节, 存储的是entry中未使用的空间的字节数. 未使用的空间即为图中的free, 它一般是由于键值对中的值被替换发生的. 比如, 键值对hello <-> word被修改为hello <-> w后, 就空了四个字节的闲置空间
    5. val_data, 为值的数据
    6. free, 为闲置空间. 由于len_of_free的值最大只能是254, 所以如果值的变更导致闲置空间大于254的话, zipmap就会回收内存空间.